Getting crafty at Christmas
I love Christmas. December is my favourite time of year – the weather is warm, people start getting into the holiday spirit and there is generally a warm fuzziness to things. At least, that is how it is for me. That being said, I am not the "Boney M-playing, tree up as soon as a Christmas beetle is spotted" kind of Christmas person (I am a teensy bit more reserved). And this is my second Christmas as a mom. So this blog is about my Christmas craft activities this year – my success, failure, frustration and a battle of the home made craft dough recipes.
.

My daughter is still a bit young to really get into the Christmas spirit. Actually, she is too young. She is at the stage where I fear for the wellbeing of my tree! And as such the tree has been secured to its stand via various bolts and blocks of wood. My tree being safe also means that El is safe from whatever mischief she could make with respect to the tree resulting in injury to herself. Double bonus. But I still want to make it special. Last year I decided to make personalised baubles by putting an imprint of El's foot onto a store-bought bauble. This year I decided it was time to try out a keep-sake dough recipe that I had found on Mamahood.
I had kept the recipe open on one of my smart phone browsers for quite some time before I saw a link to various Christmas craft ideas on Facebook and decided that I had to try it then and there. But unfortunately I did not have a hassle free experience with this dough recipe. It is a simple three ingredient recipe:
1 cup bicarbonate of soda (baking soda)
½ cup corn flour (Maizena)
¾ cup water
You combine the ingredients in a medium sized pot over medium heat. The mixture will gradually thicken and will eventually reach a consistency which looks like mash potatoes. At this point the mixture should be removed from the heat and allowed to cool.
The instructions go on about the actual process of making your desired crafts. In this case Santa Claus hand print Christmas ornaments. For finishing off your ornaments, it is stated that you can bake in the oven on a low heat or to allow to air dry for about two days with regular turning.
The instructions were easy enough to follow. The dough was a bit sticky, but I decided to use bicarb to roll it over to make it a little more manageable. Making the actual ornaments was a bit challenging because getting a one year old to let you open her palm and place it in goo without expecting her to try squish the dough is like nailing jelly to a tree. The hand prints took several tries, but eventually I got four hand print ornaments and used the remaining dough to make stars (since I had star shaped cookie cutters). A straw is useful for making the hole for the ribbon/string to go through when you want to hang your ornament up.
I put my crafts outside to dry in the nice summer heat and turned them after an hour or so. Sadly at that point I also discovered the first (of many) cracks that would form on my creations. After painstakingly waiting for two days, I put my innovative thinking to good work and got out the trusty tub of Powafix (Fill 'n fix crack filler!) and used that to fill in the cracks on my crafts. Before I started with the painting, I decided to put them in the oven on low heat just to try to get the last of the moisture out. This unfortunately resulted in the appearance of more cracks. But a little more crack filler and I was ready to paint.
I opted for a base of silver and gold metallic spray paint to give a nice finish (and help to seal the ornament somewhat). Sadly after the spray painting we had the first Santa hand print casualty. I had hoped to be able to glue it back together, but the broken off pieces crumbed. And crumbled. So that one was put aside.


.

My daughter is still a bit young to really get into the Christmas spirit. Actually, she is too young. She is at the stage where I fear for the wellbeing of my tree! And as such the tree has been secured to its stand via various bolts and blocks of wood. My tree being safe also means that El is safe from whatever mischief she could make with respect to the tree resulting in injury to herself. Double bonus. But I still want to make it special. Last year I decided to make personalised baubles by putting an imprint of El's foot onto a store-bought bauble. This year I decided it was time to try out a keep-sake dough recipe that I had found on Mamahood.
I had kept the recipe open on one of my smart phone browsers for quite some time before I saw a link to various Christmas craft ideas on Facebook and decided that I had to try it then and there. But unfortunately I did not have a hassle free experience with this dough recipe. It is a simple three ingredient recipe:
1 cup bicarbonate of soda (baking soda)
½ cup corn flour (Maizena)
¾ cup water
You combine the ingredients in a medium sized pot over medium heat. The mixture will gradually thicken and will eventually reach a consistency which looks like mash potatoes. At this point the mixture should be removed from the heat and allowed to cool.
The instructions go on about the actual process of making your desired crafts. In this case Santa Claus hand print Christmas ornaments. For finishing off your ornaments, it is stated that you can bake in the oven on a low heat or to allow to air dry for about two days with regular turning.
The instructions were easy enough to follow. The dough was a bit sticky, but I decided to use bicarb to roll it over to make it a little more manageable. Making the actual ornaments was a bit challenging because getting a one year old to let you open her palm and place it in goo without expecting her to try squish the dough is like nailing jelly to a tree. The hand prints took several tries, but eventually I got four hand print ornaments and used the remaining dough to make stars (since I had star shaped cookie cutters). A straw is useful for making the hole for the ribbon/string to go through when you want to hang your ornament up.
 |
| Rolled, pressed and cut - now to dry |
I put my crafts outside to dry in the nice summer heat and turned them after an hour or so. Sadly at that point I also discovered the first (of many) cracks that would form on my creations. After painstakingly waiting for two days, I put my innovative thinking to good work and got out the trusty tub of Powafix (Fill 'n fix crack filler!) and used that to fill in the cracks on my crafts. Before I started with the painting, I decided to put them in the oven on low heat just to try to get the last of the moisture out. This unfortunately resulted in the appearance of more cracks. But a little more crack filler and I was ready to paint.
I opted for a base of silver and gold metallic spray paint to give a nice finish (and help to seal the ornament somewhat). Sadly after the spray painting we had the first Santa hand print casualty. I had hoped to be able to glue it back together, but the broken off pieces crumbed. And crumbled. So that one was put aside.

 |
| One bites the dust |
Then it was time to break out the acrylic paints
and put on some faces.


I finished them off with 3 coats of homemade podge. Unfortunately the podge dulled the metallic sparkle somewhat, but the end results still looked good. I did decide that I would stick with the gold for the next attempt as the gold still maintained some sheen where the silver ended up looking grey.
When I made the dough again I decided to let it cool down properly before rolling it out and opted to use the corn flour for dusting (as per the actual instructions) instead of the bicarb. I allowed it to air dry again and ensured that I turned them very regularly. But alas, attempt number two was dismal. I only did three more hand prints and used the remaining dough to make stars. Two of the three hand prints were not viable. Even attempts to resuscitate just resulted in further emerging fragility.

And so I decided that the Bicarb dough was not worth repeating. I will try things twice, but a third time is a no-go. After I had encountered issues from the first attempt, I did some Googling to learn a bit more about the dough and had found this review. After reading the comments, I noted a different recipe was given and also some comments giving advice on how to successfully use the dough. Even with those hints and tips mine failed. It was time to try a different recipe.
This is very similar the standard Salt Dough recipe, although there are additions of oil and cream of tartar.
2 cups flour
2 cups water
1 cup salt
2 Tbs oil
1 Tbs cream of tartar
Mix dry components and gradually add water, stirring constantly over medium heat. It will start to get lumpy and sticky, keep heating until it pulls away from the sides. Mine did not really "pull away" but started to form a play dough-like texture (it was not sticky anymore) which prompted me to remove it from heat. I allowed it to cool and then set to work. This time I decided to also imprint her feet to make reindeer ornaments.
I found the dough a lot easier to work with, but unfortunately I did not read up much on working with salt dough and used the same thickness that I had applied for the bicarb dough. When I had glanced at how to bake it, I read somewhere that it should be baked at about 250°F so I put it at 120°C. Then I went off to bath my daughter. After the bath, I went to fetch her bottle, looked in the oven and cringed.
My ornaments had risen much like cakes and appeared to have oozed excess dough out over the baking tray. It was a mess. I attempted a salvage mission, but there was no point – the structure of the ornaments was weakened from rising and their appearance was puffy and deformed.


Fortunately the recipe yielded more than enough dough for the primary project so I was able to start over. I did not have time on my side because some of the intended ornament recipients live out of town and I wanted to have them ready for when we would be seeing them over the long weekend. So I started again that same night... doing hand prints and foot prints as El lay blissfully asleep on my bed. One would think that this would make the process easier. It did not. El tends to ball her fists in her sleep, it was quite a challenge to achieve four decent hand prints as she would curl her fingers inwards and smoosh the dough in weird directions. Before baking again, I decided to double check some salt dough recipes and saw that I should roll the dough out thinly and bake them at 100°C. It was late and I had to work in the morning so I put them in for about an hour and then resumed with baking again the next day. Unfortunately I made a repeat mistake and did not turn them soon enough. The exposed surfaces had developed a hardening shell, but the bottoms were gooey and stuck to the baking paper and so once again I was stuck with problematic ornaments. I decided to finish off the baking process (about 4 hours in the oven) with regular turning and thereafter returned to using the crack filler.


After several layers of crack filler and sanding operations to smooth the surfaces (crack filled and just plain hardened dough) I was able to paint and finish off my ornaments. Unfortunately one hand print ended up with a big crack in the crack filler repaired crater and with a bit of sheer force the ornament proved unstable and had to be binned. Fortunately I had made one more than I needed so no crisis was necessary.
And so the question is, which home made dough was better? There are premium craft doughs out there, but part of the fun is making it yourself. In future the actual dough making process can be something that little ones can participate in - even if it just involves measuring out the dry ingredients. I found advantages and disadvantages to both:

If I were to make a recommendation between the two then I would opt for the salt dough variation. When stacking up the pros and cons, both recipes come out looking comparable, but I think that the salt dough performed better overall. And it has a distinct advantage over the bicarbonate of soda recipe since the odds of ending up with good, strong ornaments is greater due to the absence of the gas cracks. When you have a low frustration tolerance, seeing beautifully finished ornaments turn into cracked disasters can really leave you feeling demotivated.
While this year's craft project did take much longer and definitely involved much more frustration, I was very happy with the end results. And El's godparents and grandparents were so happy with their keepsake gifts.
This is very similar the standard Salt Dough recipe, although there are additions of oil and cream of tartar.
2 cups flour
2 cups water
1 cup salt
2 Tbs oil
1 Tbs cream of tartar
Mix dry components and gradually add water, stirring constantly over medium heat. It will start to get lumpy and sticky, keep heating until it pulls away from the sides. Mine did not really "pull away" but started to form a play dough-like texture (it was not sticky anymore) which prompted me to remove it from heat. I allowed it to cool and then set to work. This time I decided to also imprint her feet to make reindeer ornaments.
I found the dough a lot easier to work with, but unfortunately I did not read up much on working with salt dough and used the same thickness that I had applied for the bicarb dough. When I had glanced at how to bake it, I read somewhere that it should be baked at about 250°F so I put it at 120°C. Then I went off to bath my daughter. After the bath, I went to fetch her bottle, looked in the oven and cringed.
My ornaments had risen much like cakes and appeared to have oozed excess dough out over the baking tray. It was a mess. I attempted a salvage mission, but there was no point – the structure of the ornaments was weakened from rising and their appearance was puffy and deformed.


Fortunately the recipe yielded more than enough dough for the primary project so I was able to start over. I did not have time on my side because some of the intended ornament recipients live out of town and I wanted to have them ready for when we would be seeing them over the long weekend. So I started again that same night... doing hand prints and foot prints as El lay blissfully asleep on my bed. One would think that this would make the process easier. It did not. El tends to ball her fists in her sleep, it was quite a challenge to achieve four decent hand prints as she would curl her fingers inwards and smoosh the dough in weird directions. Before baking again, I decided to double check some salt dough recipes and saw that I should roll the dough out thinly and bake them at 100°C. It was late and I had to work in the morning so I put them in for about an hour and then resumed with baking again the next day. Unfortunately I made a repeat mistake and did not turn them soon enough. The exposed surfaces had developed a hardening shell, but the bottoms were gooey and stuck to the baking paper and so once again I was stuck with problematic ornaments. I decided to finish off the baking process (about 4 hours in the oven) with regular turning and thereafter returned to using the crack filler.


After several layers of crack filler and sanding operations to smooth the surfaces (crack filled and just plain hardened dough) I was able to paint and finish off my ornaments. Unfortunately one hand print ended up with a big crack in the crack filler repaired crater and with a bit of sheer force the ornament proved unstable and had to be binned. Fortunately I had made one more than I needed so no crisis was necessary.
And so the question is, which home made dough was better? There are premium craft doughs out there, but part of the fun is making it yourself. In future the actual dough making process can be something that little ones can participate in - even if it just involves measuring out the dry ingredients. I found advantages and disadvantages to both:

If I were to make a recommendation between the two then I would opt for the salt dough variation. When stacking up the pros and cons, both recipes come out looking comparable, but I think that the salt dough performed better overall. And it has a distinct advantage over the bicarbonate of soda recipe since the odds of ending up with good, strong ornaments is greater due to the absence of the gas cracks. When you have a low frustration tolerance, seeing beautifully finished ornaments turn into cracked disasters can really leave you feeling demotivated.
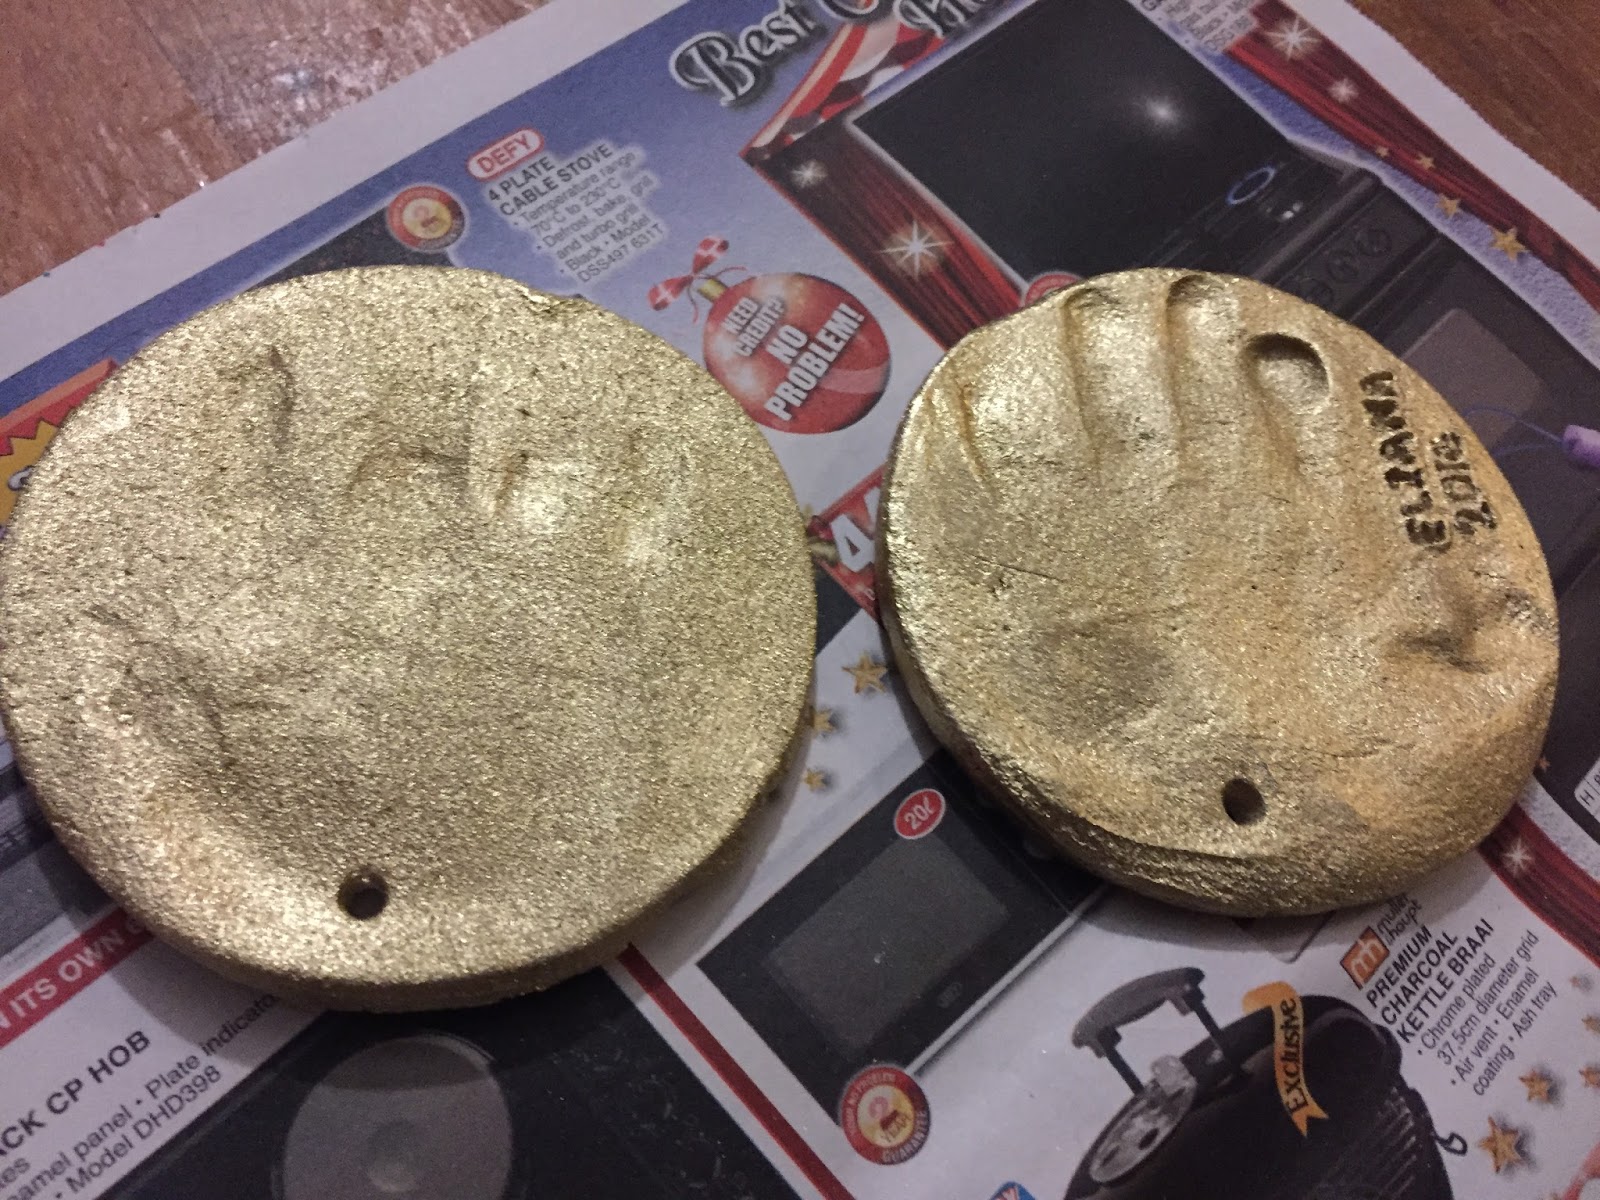 |
| Bicarbonate of soda ornament (left) versus salt dough variation ornament (right). The bicarb version definitely has a prettier finish (although this is dulled by sealing with podge). |
 |
| On Aunty Rikki and Uncle Matt's Christmas tree |
 |
| One left foot reindeer on the family Christmas tree |
 |
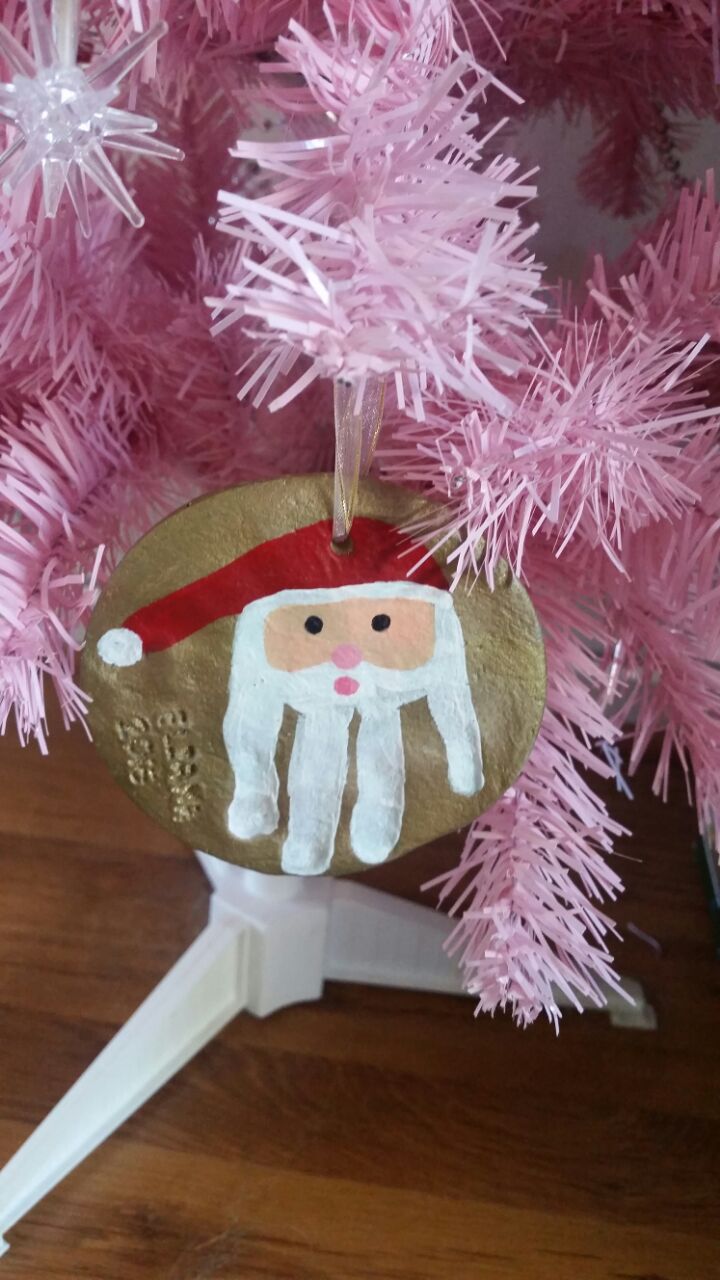
| A home made dough ornament success: a Santa hand print together with a garland of stars on the family Christmas tree |

Comments
Post a Comment